Every custom souvenir magnet program runs through one irreversible moment: the day you approve the sample. Before that moment, a change costs a few days. After it, a change costs tooling, a production slot, and sometimes an entire tourist season. This guide is about that moment — how custom fridge magnet samples are actually made, what they cost, what they can and cannot prove, and the specific checks that separate a sample you can repeat for three years from one you will argue about on every reorder.
We manufacture resin souvenir magnets at Quanzhou XinFeng Resin Industry & Trade Co., Ltd — a factory-direct plant with in-house molding and painting, a 1,200-piece minimum per design, a monthly capacity of 100,000 pieces, and a documented sampling window of 7–21 days. That is a wide range, and buyers deserve to know why it is wide, what sits at each end of it, and what a factory should be able to show you before the bulk clock starts. Most sourcing guides treat sample approval as a formality between quotation and production. It is not a formality. It is the only point in the whole program where you hold the physical product, check it against the physical standard, and still have the leverage to change something cheaply.
Why the Sample Stage Is Where a Magnet Program Is Won or Lost
A magnet program fails in three places, and all three trace back to the approval. The first is rework: a color that reads wrong on a retail peg, discovered at 8,000 units instead of at one. The second is a missed window — museum summer programs, park peak season, and airport concession resets are fixed dates that do not move because your sample took an extra round. The third is drift: the first delivery is fine, the second is slightly off, and by the third reorder nobody can say what the original agreement actually was.
None of those are manufacturing failures. They are approval failures. A sample approval is a specification — it is the document that defines what the factory is contractually permitted to ship. Approve with a Pantone reference, a measured finished size, a tested pull force, and a packing photo, and your reorder is close to automatic. Approve with “looks great, go ahead,” and you have given the plant full freedom to interpret your intent on every future run.
For buyers in the museum, national park, duty-free, tourism-board, and wholesale distribution channels, this matters more than it does for a promotional-products buyer. A promotional magnet ships once and is forgotten. A souvenir magnet is a repeating retail SKU with a place name on it. It has to be reproducible, and it has to be defensible if a retail partner compares two deliveries side by side.
The Sample Types You Will Actually Be Offered — and Which One You Approve
Suppliers use the word “sample” for at least four different things, and confusing them is the most common first mistake a B2B buyer makes. When a supplier promises a sample in three days, ask which of these they mean.
A digital mock-up is a rendered file — usually 24–48 hours, often at no charge. It proves artwork placement, dimension, and crop. It proves nothing about color, weight, surface gloss, or magnet strength, because it is a picture of an intention. It is useful for catching a spelling error before tooling. It is never an approval document.
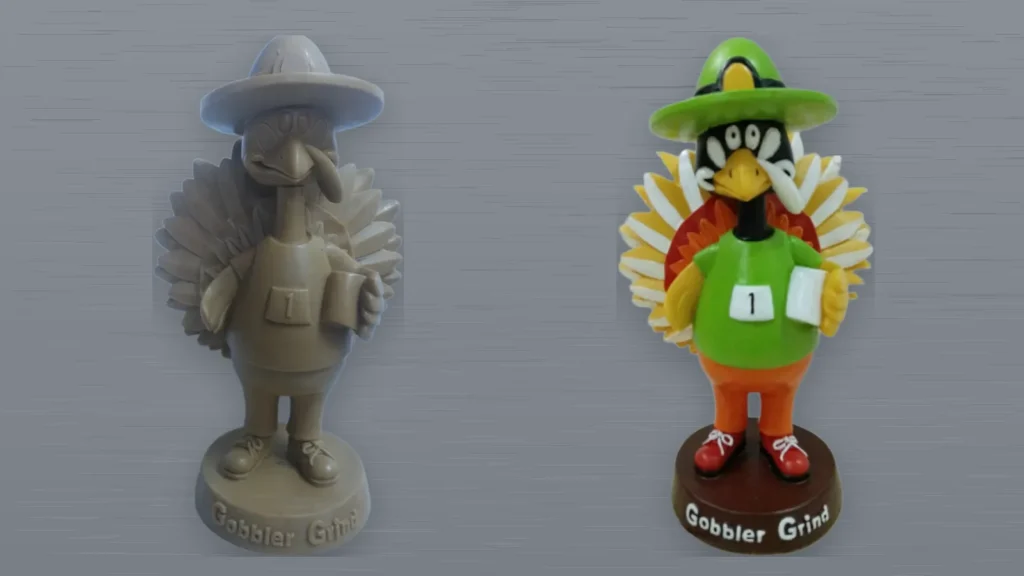
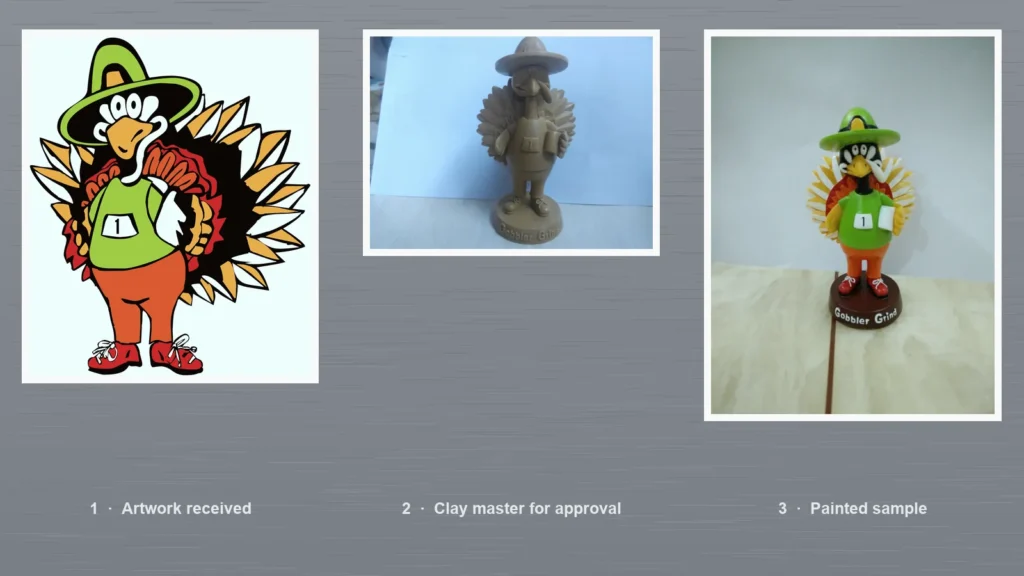
A sculpt or mold photograph is the first real physical checkpoint in a resin program. It shows the clay master or the tooling in progress and proves that the geometry is achievable. You are checking silhouette, relief depth, and whether lettering survives at the finished size. You are not checking color here, because the surface is not finished yet.
A physical pre-production sample is the one you approve. It is made with the actual mold, the actual decorating method, and the actual magnet backing that will be used on your order, which makes it the only souvenir magnet pre-production sample that carries any weight if a delivery is ever disputed. Everything downstream is measured against it. If you only insist on one thing in your supplier agreement, insist on this: for a new design, there is no approval without a physical sample in your hand.
A golden sample is that same approved piece, formally signed off in writing and archived by both sides. It is the reference the factory’s quality team works from, and the reference you compare a reorder against. Ask whether your supplier keeps one, whether it is stored away from heat and light, and whether photographs of it are attached to the production file. A factory that cannot answer that question is telling you something.
The rule that saves the most money: approve from a photograph only when nothing physical has changed — a repeat order on an existing design where the golden sample is already archived and the artwork revision is identical. For any new design, or any change to material, size, or decoration method, photos are a preview, not an approval.
Tooling Reality: Why a Resin Souvenir Magnet Needs a Clay Sculpt Before Any Mold
This is where resin souvenir magnets diverge from flat printed promotional goods, and where a lot of buyers get surprised. A flat magnet can go from artwork file straight to print. A dimensional resin piece cannot. It needs a sculpted master first, and that master is what the production mold is taken from.
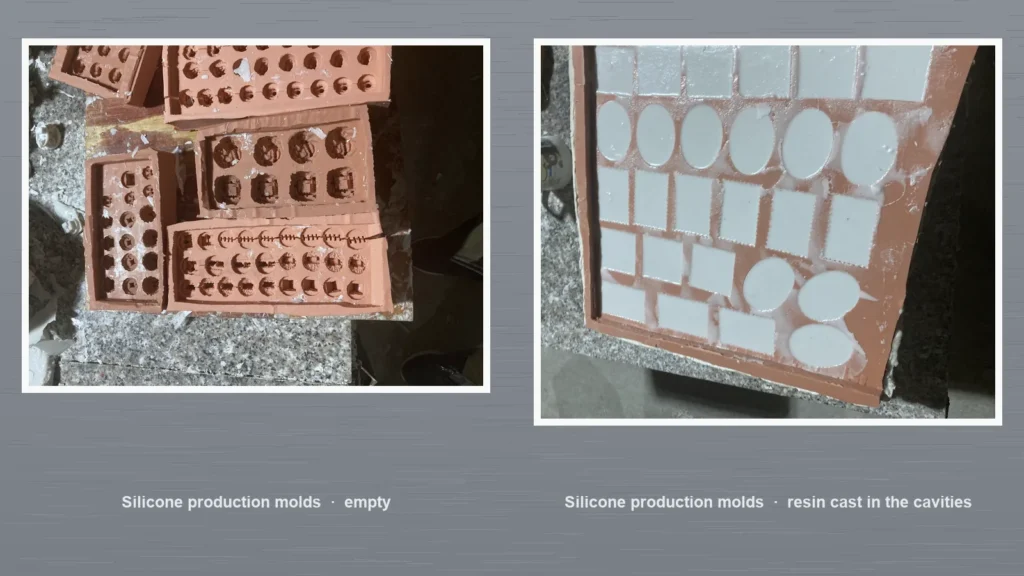
The sequence runs like this: your artwork is reviewed for molding feasibility, a clay master is sculpted at finished scale, the master is refined until the silhouette and relief read correctly, a silicone production mold is taken from it, and then pieces are cast and finished — either UV-printed or hand-painted, depending on the route you chose. The magnet is seated into a recessed well on the reverse and bonded, and the finished piece goes to packing.
Resin magnet proofing is not a single event, and treating it as one is what produces a sample that cannot be repeated. The magnet clay mold that comes out of the sculpt stage fixes the geometry permanently: whatever silhouette and relief it holds is what every subsequent piece will carry. Custom magnet tooling cost is quoted per design and charged once, which makes it easy to approve casually — and it is the decision that outlives everything else in the program.
That clay stage is why the sampling window has a range instead of a single number, and why two designs quoted on the same day can be ready at very different times. A flat, print-grade face with clean edges is quick. A dimensional landmark with fine architectural detail, thin lettering, or deep undercuts takes longer at the sculpt stage, because a mold cannot reproduce detail that the master does not carry cleanly.
It also drives your tooling line, which is quoted per design and is a one-time cost:
| Cost line | UV printing route | Hand-painted route |
|---|---|---|
| Mold cost (one-time, per design) | $45 | $100 |
| Unit price at volume | $0.23–0.25 / pc | $0.28–0.35 / pc |
| What the sample must prove | Color accuracy, registration, print edge crispness on a curved or flat resin face | Color build-up, shading consistency, brush control across multiple units |
| Best suited to | Photo-real destination scenes, dense detail, tight deadlines | Mascots, figurines, pieces where hand-finish is the perceived value |
| Minimum order per design | 1,200 pcs | 1,200 pcs |
| Reproducibility risk on reorder | Lower — the print file is the file | Higher — hand built, so the golden sample does more work |
Read that last row carefully. On a hand-painted program, the golden sample is not a nice-to-have; it is your only defense against a reorder that comes back slightly different in tone. On a UV program, the print file is a fixed asset, and the sample’s main job is to confirm that the file lands correctly on the physical surface. Ask your supplier which route they are sampling, and ask why — a plant that can genuinely run both will explain the trade-off instead of quoting whichever is cheaper.
What to Send With Your Sample Request
Most sampling delays are not manufacturing delays. They are questions the factory had to ask because the brief did not answer them. A complete request moves through the sculpt stage without a pause. At minimum, send:
- Vector artwork — AI, EPS, or editable PDF, with the outline clearly defined and colors referenced rather than described. A JPEG communicates the idea; it does not define separate color areas for molding.
- Finished size in millimeters or inches, and the orientation you consider correct.
- Quantity per design, not just a project total. Pricing is tiered at 5,000, 20,000, and 50,000 pieces, so stating your band in the brief lets the quote and the sample be built against the right tier.
- Decoration route preference — UV or hand-painted — or a clear brief on which qualities you are prioritizing so the factory can recommend one.
- Magnet backing requirement and any expected holding duty, since the backing is bonded at finishing and is hard to change later.
- Packaging format — polybag, backing card, EPE foam insert tray, gift box — and any barcode, SKU, or destination-sorting requirement.
- Destination market, because it determines which compliance documentation you need at the sample stage.
- Your in-hand-by date, so the factory can tell you honestly whether the window closes with room to spare.
If your artwork is not yet print-ready, that is a separate problem with a separate fix, and it is worth resolving before sampling begins — a brief built on a weak file produces a sample you will reject for the wrong reason.
What a Custom Fridge Magnet Sample Costs — and What Gets Credited Back
Sampling cost has two components and they behave differently, which is why quotes for “a sample” can look confusingly far apart.
The first is the tooling or mold charge. On our line that is $45 for a UV design and $100 for a hand-painted design, per design, charged once. It is not a deposit and it does not come back, because the mold physically exists afterward and stays in the program. Set against a 1,200-piece opening order, a $100 hand-painted mold is a rounding error in the total program cost — and it is the difference between a piece with hand-finished depth and a flat print.
The second is the sample or model charge itself, which covers the physical work of producing the piece and getting it to your desk. This varies with the design and the decoration route and is best confirmed on your quotation rather than assumed, because a supplier who quotes a flat number for every design is either subsidizing the complex ones or oversimplifying them.
Two things are worth writing into the paperwork before the mold is cut. First, whether the sample charge is credited against the bulk invoice or refunded when you place an order that meets the minimum, and at what quantity that kicks in. Second, whether the mold charge covers one round of revision or whether further rounds are billed. Revision terms are where budget surprises live, and they cost nothing to agree in advance.
Do the arithmetic before you negotiate. A program of three designs at 5,000 pieces each, hand-painted, means $300 of tooling spread over 15,000 units. Framed that way, the useful question is not “how do I get the sample for free” but “how do I avoid needing a second round” — which is a brief-quality question, not a price question.
How Long Sampling Actually Takes — Reading the 7–21 Day Window
Our documented sampling window is 7–21 days, and the reason it is a window rather than a number is that the stages inside it are not equally weighted. A simple flat design on the UV route can complete in about a week. A dimensional, hand-painted piece with fine detail sits at the far end. The number you should ask for is not the range — it is which stage your design sits at, and what would push it later.
| Stage | What it proves | What you check | Typical position in the window |
|---|---|---|---|
| Artwork feasibility review | The design can be molded at all | Stroke widths, small lettering, undercuts, color separation | Days 1–3 |
| Clay master sculpt | Silhouette and relief read correctly at finished size | Shape accuracy, relief depth, legibility of any text | Days 3–12, depends on complexity |
| Silicone production mold | The master can be reproduced consistently | Edge definition, surface quality, absence of mold lines in critical areas | Days 8–15 |
| Physical sample piece | The finished article matches what you specified | Color, dimensions, gloss, magnet seating, backing retention | Days 12–21 |
| Express sample dispatch | Nothing — but it is where schedules are lost | Courier transit, customs, and your own internal review time | Add 3–7 days in transit |
| Written approval | Your specification now exists | That every agreed number is on the record | Your side of the clock |
Two conclusions follow. The first is that transit is inside your schedule even though it is outside the factory’s. The second is that the approval step belongs to you, and a sample that sits in a receiving bay for a week costs exactly as much as a week of production delay. When buyers tell us a program ran late, the factory half of the timeline is usually intact.
The window also determines your bulk date, because bulk production runs 45–60 days from sample approval — not from order date. Those two events are different, and the gap between them is entirely under your control. Build your season calendar backwards from the retail date, reserve 45–60 days for bulk, 7–21 days plus transit for sampling, and then add the buffer that stops the whole thing being fragile. For a summer program, that puts the artwork brief in your own calendar, not the factory’s.
The Pre-Production Sample Approval Checklist: Seven Things to Verify Before You Sign
Run these in order and record each one with a photograph. Every item you document now is an argument you do not have to have later.
- Dimensions and finished size. Measure the piece with a rule or caliper, not by eye, and record the numbers. Compare against the spec. A piece that looks right but is two millimeters narrow is a piece that will not seat correctly in the packaging you already approved.
- Color against a reference. Put your Pantone swatch or approved color chip beside the sample under consistent lighting and photograph them together. “Close enough” is not a specification. Color is the single largest source of reorder disputes in this category because memory is a terrible reference standard.
- Pull force on a real substrate. Test the magnet on the surface it will actually meet, and record the result. Our line tests pull force at 450g across 100% of output, which is a production standard rather than a sample promise — but you should still satisfy yourself that the sample your program is based on meets the holding duty you sold to your retail partner.
- Surface and edge quality. Check gloss consistency, look for mold lines across the face, and inspect the edges for flash or roughness. Small imperfections are forgivable on one sample and expensive across 5,000 pieces.
- Magnet seating and retention. The backing should sit flush in its well with no rocking. Check it will not lift at the rim, and confirm the decorative face and magnetic layer are properly bonded rather than merely touching.
- Packaging, if packaging is part of the program. Ask for the sample to be packed in the final format. EPE foam insert trays, backing cards, and lot-numbered cartons are part of the product experience and part of your retail partner’s receiving process, and they are much cheaper to change at sample stage than after a container is loaded.
- Compliance documentation for your destination. Confirm which documents will travel with your order. Our file includes a REACH 168-item test on the painted finish, an SVHC test, an SGS polyresin material report, a CSDS for the nitro paint, an MSDS for the magnet, a transport test report for the UV resin magnet, and TÜV Rheinland verification of supplier status. For CPSIA and EN71 requirements, the correct answer is a program-specific third-party lab report, and it should be confirmed before you approve rather than after you ship.
Color, Pull Force, and Yellowing: The Three Tests That Should Be In Your Sample Review
Beyond the checklist, three measurements do most of the work of making a sample approval durable.
Color. Judge it under the light your product will be seen in, and define the tolerance in writing. Across the industry, a color difference within roughly Delta E 2 is generally treated as an acceptable match; beyond that, buyers and factories are simply comparing opinions. The practical move is to approve the color as photographed beside a reference, and to state that in your approval message. It collapses the argument to a single artifact.
Pull force. Strength claims are worthless without a method. A published Gauss rating on a magnet datasheet describes the magnet, not the assembled product, and the assembled product is what holds your magnet to a fridge door. What matters is the vertical pull-off force of the finished piece on the intended surface, measured the same way every time. On our line that is a 450g standard verified across the full output, not a sampled estimate — which is the level of assurance you should be asking for on a repeating retail SKU.
Yellowing. This is the resin-specific check that flat-goods buyers never think about and resin programs always should. Warm retail and display lighting ages some decorative finishes over time, and the failure appears months after delivery, on the customer’s wall, where you cannot defend it. Our programs are tested for 48 hours under 6500K retail light. Ask how your supplier evaluates it. A supplier who has never been asked this question has probably never measured it, and a yellowed landmass on a national park magnet is a defect your retail partner will attribute to you, not to the factory.
Sample-to-Bulk Drift: Why the Sample Room Is Not the Production Line
Here is the uncomfortable truth about sampling. A sample is usually made carefully, by the most skilled hand on the floor, at a pace that does not exist in mass production. A production line runs faster, with more units in play and different operators. That gap — sometimes called sample-production drift — is the reason a program that produced a beautiful sample can still deliver a mediocre first shipment.
You cannot eliminate the gap by inspecting harder. You reduce it by making the reference standard explicit and by agreeing how quality will be judged:
- Archive the golden sample on both sides. The factory keeps a stored reference; you keep the one you approved. Both parties compare against the same object instead of against memory.
- Agree an inspection standard. Our production runs to AQL 2.5, which defines how many pieces are sampled and what defect rate is acceptable. Discussing that number at sample stage, rather than after a dispute, is the whole point.
- Agree the acceptance criteria in observable terms. “Good quality” cannot be adjudicated. Dimensions with a tolerance, color against a reference, pull force against a measured value, and named defects that constitute rejection can be.
- Ask about the first batch. A first-article or pilot-run check on the initial output confirms that the setup matches the approved sample before the bulk of the order proceeds.
- Keep traceability. Lot-numbered cartons let a problem be isolated to a run rather than attributed to the whole shipment — which matters enormously for a program that repeats every season.
Approving in Writing: What Your Sign-Off Actually Authorizes
An approval message is a contract in miniature. Keep it short and specific, and keep the photographs attached. A workable approval names the design and revision it refers to, states the approved finished size, references the color photograph and the swatch it was compared against, records the pull-force test and the substrate it was run on, confirms the packaging format, and lists any agreed deviations — the small, deliberate differences you have accepted. That last item matters more than buyers expect. Acknowledged deviations are a specification. Unacknowledged ones become disputes.
Once approval is sent, the bulk clock starts. Production runs 45–60 days from approval, and a monthly capacity of 100,000 pieces means the plant’s calendar fills in sequence, not on demand. Approval timing, not negotiation, is what determines whether your magnets are on a shelf before the season or after it.
Then treat the approval as a reusable asset. Store the golden sample, the color photograph, the measured dimensions, and the packing notes together, and pull them out before the next order. A program that has good sampling documentation on file can add a second destination or a companion SKU in a fraction of the time the first one took, because the reusable part of a magnet program is not the artwork — it is the approved standard.
Matching Sample Discipline to Your Buyer Persona
Different channels need different things proved at sample stage, and knowing which one you serve sharpens your checklist.
Museum stores usually run a small number of exclusive designs with curated provenance. The sample review should weight relief fidelity and finish quality heavily, because a museum gift store magnet program is judged as merchandise, and a museum buyer will notice a mold line that a mass-market buyer never sees.
National parks and scenic-area retail run volume against hard seasonal dates. Your sample review should prioritize color accuracy under varied light, pull force, and packaging robustness, and your calendar should be built backwards from opening day. The date is not negotiable; the design is.
Airport duty-free and gift counters impose the strictest packaging and barcode discipline. Approve the sample packed in the final format, with the barcode artwork verified on the card, because a receiving rejection at a duty-free warehouse is expensive and entirely avoidable at sample stage.
City tourism boards buy against brand guidelines, which usually means a tightly controlled color palette. Never approve a brand color without a physical reference and a comparison photograph. A tourism board’s identity is the product.
Wholesale distributors handle many SKUs and will value consistency above all else. For that channel, the sample conversation should focus on golden-sample archival, lot numbering, and the AQL standard, because your program’s value to a distributor is predictability, not novelty.
Common Sampling Mistakes B2B Buyers Make
- Approving from a digital mock-up for a new physical design. Layout is not a product.
- Approving color without a written reference. Memory and screen color cannot be adjudicated.
- Testing magnet strength on a smooth lab plate and assuming it transfers to a real refrigerator door.
- Never archiving a golden sample, which means every reorder restarts the conversation from scratch.
- Letting artwork changes slip in mid-sampling without a written change note, so nobody can say which revision the sample represents.
- Starting the season clock at order date instead of approval date, then discovering the bulk window is 45–60 days and the buffer is gone.
- Skipping transit time in the schedule, as though a sample materializes on your desk the moment it leaves the plant.
- Not asking what a revision round costs until you need one.
Frequently Asked Questions
How long does a custom fridge magnet sample take?
Our documented window is 7–21 days, measured from a complete brief to a finished physical sample. Simple flat designs on the UV printing route sit near the short end; dimensional hand-painted pieces with fine detail take longer because of the sculpt and mold stages. Express transit adds roughly 3–7 days on top, and it belongs in your schedule even though it is outside the factory’s.
Do you charge for a magnet sample?
Yes. Sampling involves real labor, a sculpted master, and a production mold, so it is not a free service — a supplier offering free physical samples for custom new designs is recovering that cost elsewhere. The charges split into a one-time mold cost of $45 for a UV design or $100 for a hand-painted design, plus a sample charge that varies with design complexity and decoration route. Both should appear on your quotation.
Is the sample fee refundable on a bulk order?
Terms vary by program and are best agreed in writing before the mold is cut, along with the quantity threshold at which any credit applies. What matters is that the rule is documented on the quotation rather than negotiated after the fact.
Clay mold vs production mold: what is the difference in a resin magnet program?
The clay master is the sculpted original that defines the shape, relief, and detail of your design at finished scale. The silicone production mold is taken from that master and is what actually produces your pieces. The master decides whether the design is achievable; the production mold decides whether it is reproducible. Detail missing from the master can never be recovered downstream, which is why the sculpt stage gets reviewed before anything is cast.
Can I approve a magnet sample from a photograph?
Only for a repeat order where the golden sample is already archived and nothing physical has changed. For a new design, or any change to material, size, or decoration method, a photograph shows placement but cannot verify color, gloss, weight, or magnet strength. Approve the physical piece.
How do I check magnet pull force on a sample?
Test vertical pull-off force on the surface the magnet will actually be used on, and record both the result and the method. Avoid judging strength by feel, and do not rely on a Gauss rating from the magnet datasheet, which describes the magnet rather than the assembled product. Our production standard is a 450g pull force verified across 100% of output.
What starts the 45–60 day production clock?
Sample approval, not order placement. The two events are usually weeks apart, and only one of them is under the factory’s control. If you are planning around a fixed retail date, put the approval date in your own calendar and work backwards from it.
How do I keep a reorder consistent with my first delivery?
Archive the approved golden sample and the accompanying photographs, measurements, and packing notes, and ask your supplier to store a reference copy too. Combine that with a documented inspection standard — our runs use AQL 2.5 — and lot-numbered cartons so any deviation can be isolated to a specific run rather than blamed on the program as a whole.
Request a Quote
If you are planning a souvenir magnet program for a museum, a national park, an airport counter, a tourism board, or a distribution network, the fastest way to a sample you can actually approve is to send a complete brief. Share your artwork, finished size, quantity per design, decoration preference, packaging format, destination market, and in-hand-by date, and we will come back with a quotation that lists the mold cost, the unit price at your tier, the sampling timeline, and the bulk window — all in writing, with no trading-company markup in between.
Request a quote from our factory and start with the sampling conversation, not the price conversation. Programs that plan the sample properly rarely need a second round, and that is where the real saving in a magnet program lives.

- Custom Fridge Magnet Sampling and Proofing: The B2B Guide to Approving a Sample (2026) - October 15, 2026
- Custom Mold Ownership & Design IP Protection for Souvenir Magnets: A B2B Buyer’s Guide (2026) - October 9, 2026
- Custom Fridge Magnet Packaging & Barcodes: The B2B Guide to Retail-Ready Presentation (2026) - September 30, 2026